Planning your DIY Project
Planning your DIY Project
Planning your DIY project before jumping into the building phase is one of the most crucial steps to ensure success. Proper planning not only saves you time and money but also leads to a higher-quality result that you can be proud of. Whether you’re building a new piece of furniture or redesigning a room, a well-thought-out plan is key to turning your vision into reality. Here’s how to effectively plan your DIY project to set yourself up for success!
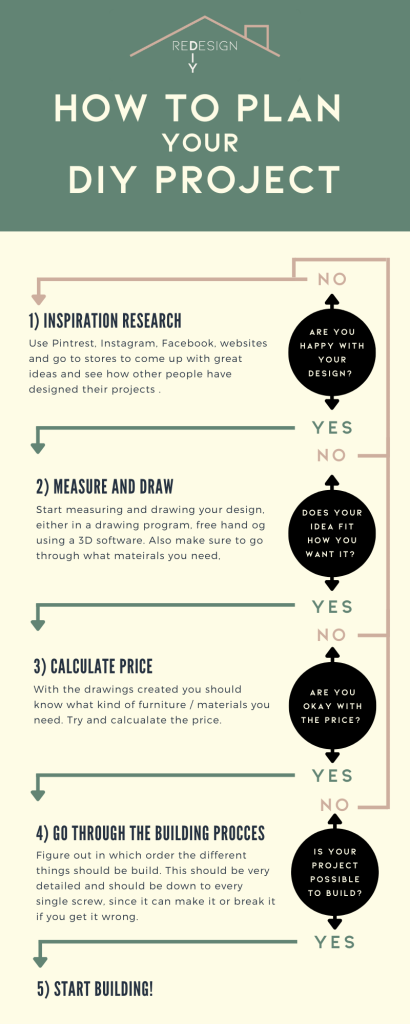
1) Inspiration Research
The first step in planning your DIY project is gathering inspiration. Spend some time exploring various platforms like Pinterest, Instagram, and Facebook, as well as visiting websites dedicated to DIY projects. Seeing how others have designed and built similar projects can spark ideas and help you refine your own plans. Don’t just limit yourself to online research—take a trip to local stores to see designs, materials, and furniture options in person.
During this stage, ask yourself, “Am I happy with my design?” If the answer is yes, move on to the next step. If not, go back and continue your inspiration research until you have a clear vision of what you want to create.
Pro Tip: Create a mood board or a digital collection of photos that capture the style, colors, and materials you’re aiming for. This will serve as a reference point throughout the project.
Are you happy with your design?
- Yes: Move to the next step.
- No: Restart step 1.
2) Measure and Draw
Next up in planning your DIY project is the measurement and drawing phase. Start by measuring the area where your project will take place. Accurate measurements are essential to ensure that your design will fit perfectly within the intended space.
Once you have the measurements, it’s time to draw out your design. You can do this freehand on paper, use a drawing program, or take advantage of 3D software for a more detailed and realistic view of your project. The drawing process also includes identifying the materials you’ll need, so make sure to jot down a comprehensive materials list.
Pro Tip: Using 3D software can give you a better sense of how your project will look and fit within the space. It also allows you to experiment with different layouts and designs before committing to a final plan.
Does your idea fit how you want it?
- Yes: Move to the next step.
- No: Go back to step 1 for more inspiration and adjustments.
3) Calculate the Price
A crucial part of planning your DIY project is determining the cost. With your design and materials list ready, start calculating the total price of your project. Look up the prices of the materials and any furniture you plan to include. Make sure to consider every aspect, from large items like lumber and tools to smaller essentials like screws, nails, and paint.
This is the stage where you’ll need to decide if the project is within your budget. If the price is too high, consider revisiting your design to find areas where you can cut costs without compromising on quality.
Pro Tip: Check for discounts or sales on materials, or consider upcycling and using leftover materials from previous projects to save money.
Are you okay with the price?
- Yes: Move to the next step.
- No: Go back to step 1 to revise your design and material choices.
4) Go Through the Building Process
The next step in planning your DIY project is to figure out the building process in detail. This involves creating a step-by-step plan of how you will assemble your project, including the order of construction and the tools you’ll need for each step. Being thorough at this stage is crucial; understanding the building process down to the smallest details (yes, even every single screw!) can prevent costly mistakes and ensure the project is structurally sound.
Think about potential challenges you might encounter and how you’ll address them. For instance, if a particular material needs to be cut to a specific size, make sure you know how to do it accurately and safely.
Pro Tip: Create a checklist of the construction process so you can mark off each step as you go, helping you stay organized and on track.
Is your project possible to build?
- Yes: Move to the next step.
- No: Revisit step 1 to rethink your design and plan.
5) Start Building!
Congratulations! You’ve now completed the essential steps of planning your DIY project and are ready to start building. By following the previous steps, you’ve gathered inspiration, measured and designed your project, calculated costs, and prepared a detailed building plan. Now, it’s time to bring your vision to life. With a solid plan in place, the construction process will be smoother, more efficient, and more enjoyable.
Final Thoughts on Planning Your DIY Project
Planning your DIY project is the foundation of success. By taking the time to thoroughly research, measure, budget, and plan out the construction process, you set yourself up for a smoother build and a better end result. Skipping these planning steps can lead to costly mistakes, unnecessary stress, and a final product that may not meet your expectations.
Remember, the planning phase is an iterative process. Don’t be afraid to go back and make adjustments if something doesn’t feel right. A little extra time spent in the planning phase can save you a lot of trouble during the building process. So, gather your inspiration, measure twice, budget wisely, and then get building!
Ready to take on your next DIY project? Follow this guide, and you’ll be well on your way to creating something amazing!

redesigndiy.com
Recent Posts
GET IN TOUCH
Copyright @ 2024 - Redesign DIY


