DIY Shoe Rack for Small Spaces: Step-by-Step Guide to Building Your Own
Are you tired of tripping over scattered shoes in your small entryway or closet? A DIY shoe rack for small spaces is the perfect solution! With a few basic materials and some creativity, you can build a stylish and functional shoe rack that maximizes space. In this step-by-step guide, we’ll show you how to build a sleek shoe rack like the one we recently made to organize our collection and keep our home clutter-free.
Total price
$0
Estimated time
10 Working hours
Difficulty
2/5
Before We Started: The Problem with Small Spaces
Shoe storage can be challenging, especially in small spaces. We had a corner that was underutilized and often became a dumping ground for footwear. To make the most of this area, we decided to build a custom shoe rack using sturdy shelves that could fit a variety of shoe types, from sneakers to boots.
Step 1: Measure the Space and Plan Your Design
The first step in building a DIY shoe rack for small spaces is to assess your available area. We measured the height, width, and depth of the space where we wanted to install the rack.
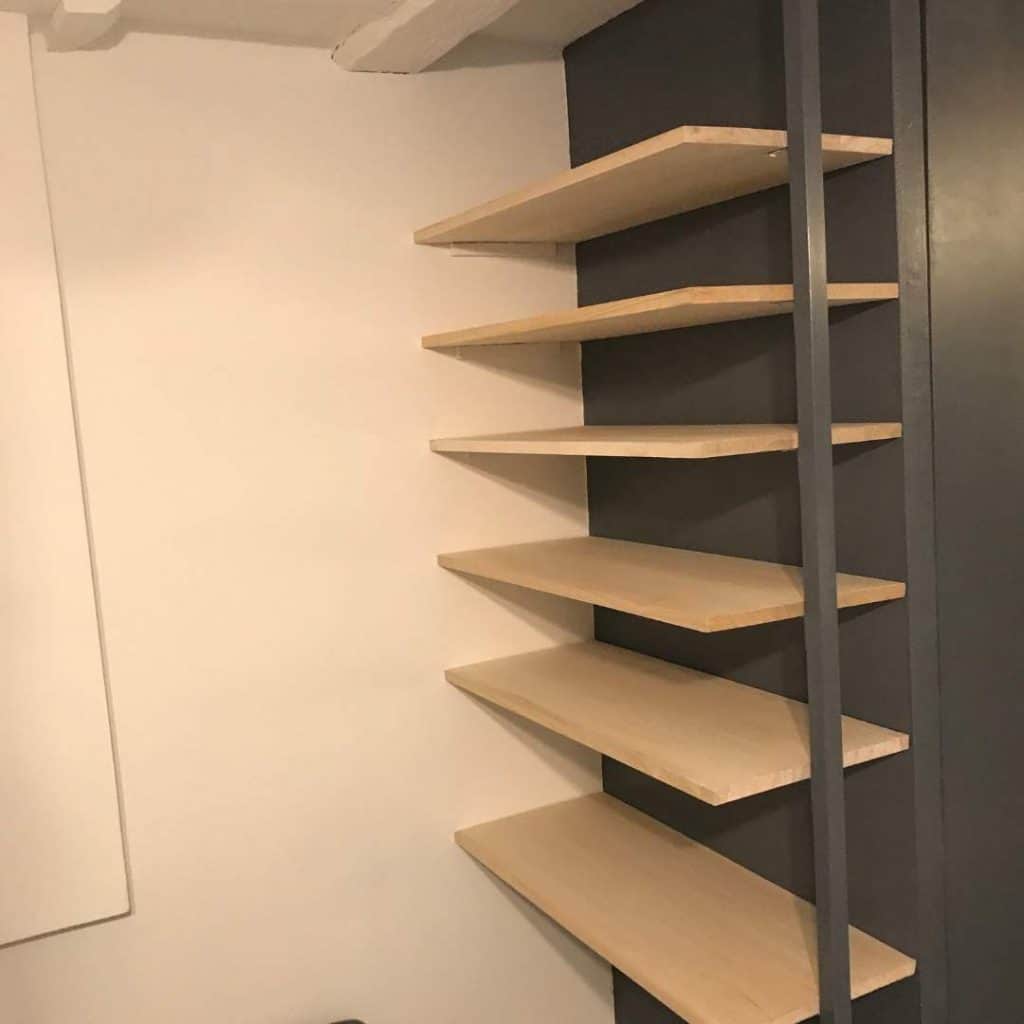
In our case, we had a narrow corner, so we designed the rack to be vertical, with multiple shelves spaced apart to accommodate different types of shoes. We decided on six shelves to maximize storage while keeping it accessible.
Pro Tip: Sketch out your design before buying materials. Think about the types of shoes you’ll be storing; boots need more height between shelves, while sneakers and flats require less space.
Tools: Measuring Tape, Pencil, Notebook Materials: Paper for Sketching
Step 2: Gather Materials and Cut the Shelves
With our design finalized, it was time to gather materials. We used sturdy plywood for the shelves, cut to our desired dimensions. For the frame, we used a wooden beam as the main support on the outer side. This beam would provide both stability and an aesthetic touch to the shoe rack.
We also cut smaller pieces of wood to attach directly to the wall for shelf support. These pieces were carefully measured and cut to match the dimensions of each shelf, ensuring a snug fit.
Materials List:
Plywood (cut into six shelves)
Wooden beam for the outer frame
Small wooden pieces for wall supports
Metal angle brackets
Screws and wall anchors for mounting
We then sanded down the edges of the shelves and the wooden beam to create a smooth finish, preparing them for painting.
Pro Tip: Measure and cut all the shelves and support pieces at once to save time and ensure they are uniform. Sanding the edges gives a more polished appearance.
Once the wood was cut, we moved on to painting. To match the rest of the room’s decor, we painted the wooden beam a sleek grey color. This beam not only acts as the main support for the shelves but also adds a stylish frame to the shoe rack.
The smaller pieces of wood that we attached to the wall for shelf support were painted white to blend seamlessly with the wall. This subtle detail helped the shoe rack appear as though it was built directly into the space, creating a clean and cohesive look.
Pro Tip: Use a matte finish paint for a modern, understated style. Make sure to let each coat dry completely before moving on to installation.
Tools: Paintbrush, Drop Cloth (to protect surfaces) Materials: Grey Paint (for the wooden beam), White Paint (for the wall supports)
Step 4: Install the Wooden Beam and Wall Supports
With the paint dry, we began the installation process. First, we mounted the wooden beam on the outer side of the shoe rack using screws and wall anchors. This beam served as the main structural support and added a stylish frame to the overall design.
Next, we attached the small wooden support pieces directly to the wall where each shelf would go. We secured these pieces with screws and wall anchors, ensuring they were level and evenly spaced. These supports would hold up the inner edges of the shelves, while the outer edges would rest on the wooden beam.
To further secure the shelves, we used metal angle brackets attached to the wooden beam. This provided extra support and ensured the shelves remained sturdy, even when loaded with shoes.
Pro Tip: Use a level to ensure the support pieces and wooden beam are straight. Proper alignment is crucial for both stability and appearance.
Tools: Level, Drill, Screws, Wall Anchors Materials: Wooden Beam, Small Wooden Pieces, Metal Angle Brackets
Step 5: Mount the Shelves onto the Brackets
With the brackets securely in place, we slid the wooden shelves onto them. Each shelf rested on the brackets and was further secured with screws to prevent shifting. This method provided a sturdy support system, allowing us to store even heavier shoes like boots on the lower shelves.
Pro Tip: Secure each shelf to the brackets with screws to add extra stability, especially if you plan to store heavier items on the rack.
Tools: Screwdriver, Drill Materials: Screws
Step 6: Organize Your Shoes and Enjoy!
Once the shelves were mounted, it was time to arrange our shoes. We placed boots on the bottom shelves, which had more vertical space, and used the upper shelves for smaller shoes like sneakers, sandals, and heels.
The end result was a DIY shoe rack for small spaces that not only looked great but also made finding and storing shoes a breeze. The rack transformed our corner into a functional and stylish storage solution, adding to the overall aesthetic of the room.
Final Thoughts on Building a DIY Shoe Rack for Small Spaces
Building a DIY shoe rack for small spaces is a simple yet effective way to organize your footwear and declutter your home. By customizing the design to fit your space and needs, you can create a rack that maximizes storage while enhancing your room’s decor. This project cost us around $100 and took just 10 hours to complete, making it an affordable and rewarding DIY endeavor.
Ready to tackle your own shoe storage challenges? Follow this guide, gather your materials, and enjoy the satisfaction of a clutter-free, organized home!