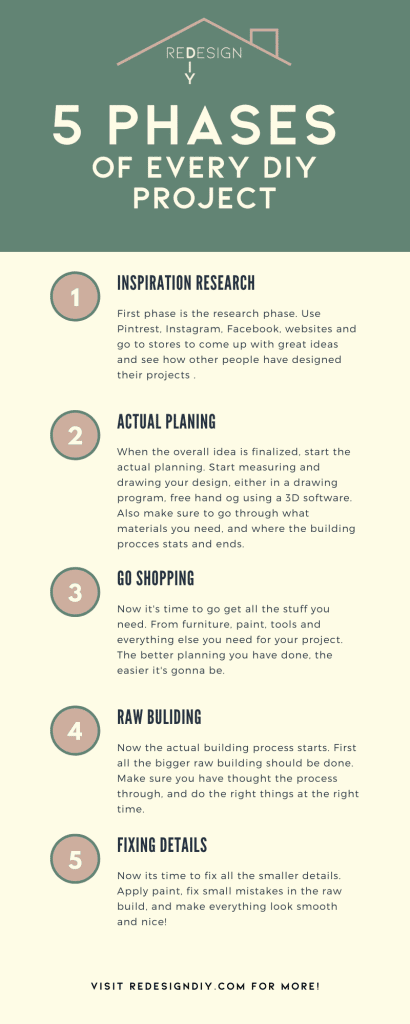
5 Phases of every DIY project
The 5 Phases of Every DIY Project: An In-Depth Guide to Success
Embarking on a DIY project can be both exciting and daunting. Whether you’re painting a room, building furniture, or creating a piece of home decor, every DIY project follows a similar path from start to finish. The key to success is understanding the 5 phases of every DIY project and preparing for each step. In this comprehensive guide, we’ll walk you through each phase to help you enjoy a smoother, more successful DIY journey.
Phase 1: Inspiration – Where Ideas Take Flight
The first of the 5 phases of every DIY project is the inspiration phase. This is where your ideas come to life and the foundation of your project is built. Inspiration can come from anywhere: a stunning Pinterest board, a stroll through nature, a home decor magazine, or simply the desire to refresh a space in your home.
Finding Inspiration:
- Online Sources: Platforms like Pinterest, Instagram, and YouTube are treasure troves for DIY enthusiasts. Pinterest is ideal for finding ideas ranging from small crafts to full-scale renovations. YouTube offers not only inspiration but also step-by-step tutorials. Instagram design influencers showcase a variety of styles and often link directly to the materials used.
- Home Decor Magazines and Books: Sometimes, stepping away from screens can spark creativity. Browse through magazines like Architectural Digest, Better Homes & Gardens, or Real Simple for unique ideas. Books focused on interior design, woodworking, or crafts are also great sources.
- Real-Life Inspirations: Visiting home improvement stores, art galleries, or even a friend’s home can help you visualize textures, colors, and designs in person.
Defining Your Goals: In this phase, define what you want to achieve with your project. Consider these questions:
- What is the purpose of the project—functionality, aesthetics, or both?
- What style or theme do I want to incorporate?
- What is my budget and timeline?
Write down your goals, ideas, and a rough sketch of the final product. This mental or physical outline will be your guide as you move forward through the remaining phases of every DIY project.
Phase 2: Planning – The Blueprint of Success
The second of the 5 phases of every DIY project is planning. This is where inspiration meets action, and dreams are converted into concrete steps.
Creating a Detailed Plan:
- Sketch Your Ideas: If your project involves a design element, sketch out your ideas. It doesn’t need to be professional—simple diagrams help visualize the outcome.
- Make a List of Materials: Break down every component and list all the materials required. Be specific about sizes, quantities, and types. For example, if you’re building a shelf, list the exact dimensions of wood, types of screws, paint colors, etc.
- Research Costs: With your material list ready, research prices online or at local stores. Price comparisons can help you find budget-friendly options without sacrificing quality.
Setting a Realistic Timeline: Setting a realistic timeline is crucial for any DIY project. Some projects take just a few hours, while others may span weeks. Consider factors like drying time for paint, curing time for adhesives, or delivery times for custom-ordered materials. A well-planned timeline helps keep the project on track and reduces frustration.
Phase 3: Preparation – Ready, Set, Prep!
Preparation is the third phase of the 5 phases of every DIY project, and it often separates a smooth DIY experience from one riddled with setbacks.
Gathering Supplies: Double-check your materials list and gather everything you’ll need before starting. Being halfway through a project only to realize you’re missing a key component can be frustrating and time-consuming.
Setting Up Your Workspace:
- Space: Choose a well-ventilated area, especially if you’re using paints or chemicals. Ensure there’s enough room to move around and accommodate your tools.
- Protect Your Area: Use drop cloths, tarps, or old newspapers to protect floors and furniture from spills or scratches.
- Organize Your Tools: Lay out all necessary tools in an accessible manner to prevent interruptions during your workflow.
Safety First: Don’t forget safety equipment like gloves, goggles, or masks if your project involves hazardous materials. Safety is paramount and ensures an enjoyable DIY process.
Phase 4: Execution – Bringing Your Vision to Life
The fourth of the 5 phases of every DIY project is where your hard work starts to pay off: the execution phase. With all your planning and preparation in place, it’s time to roll up your sleeves and bring your project to life.
Step-by-Step Approach: Work methodically and take your time. If you’re following a tutorial, go through each step carefully. Rushing through this phase can lead to mistakes that may require costly fixes or even starting over.
Troubleshooting on the Fly: Even with meticulous planning, unexpected issues can arise. Maybe the paint doesn’t go on smoothly, or a piece of wood doesn’t fit as expected. When problems occur:
- Re-evaluate: Take a moment to assess the issue and brainstorm potential solutions.
- Consult Resources: Look online for solutions. DIY communities on forums and social media are often willing to share advice and tips.
Patience is key in this phase. Every project has its challenges, but with persistence, you can overcome obstacles and keep moving forward.
Phase 5: Completion and Reflection – Celebrating Your Success
You’ve reached the final phase of the 5 phases of every DIY project—completion. Now it’s time to step back and admire your hard work.
The Final Touches: Add the finishing touches that bring your project to life. This might include applying a final coat of paint, installing hardware, or arranging your new creation in its designated space. These details enhance the overall aesthetic and complete your project.
Reflect and Learn: Every project is a learning experience. Take some time to reflect:
- What went well?
- What challenges did you encounter, and how did you overcome them?
- What would you do differently next time?
Reflection helps improve your skills and prepares you for future DIY endeavors. Understanding what worked and what didn’t will make your next project even more successful.
Conclusion: Embrace the 5 Phases of Every DIY Project
Every DIY project is a journey through these 5 phases. By understanding and embracing each phase, you ensure that your projects are both successful and enjoyable. From the initial spark of inspiration to the final reveal, every stage offers valuable lessons and rewarding experiences. So, take your time, savor each step, and most importantly, have fun creating something uniquely yours!
Now that you know what to expect in each phase, you’re ready to tackle your next DIY project with confidence. Happy crafting!
Planning your DIY Project
Planning your DIY Project
Planning your DIY project before jumping into the building phase is one of the most crucial steps to ensure success. Proper planning not only saves you time and money but also leads to a higher-quality result that you can be proud of. Whether you’re building a new piece of furniture or redesigning a room, a well-thought-out plan is key to turning your vision into reality. Here’s how to effectively plan your DIY project to set yourself up for success!
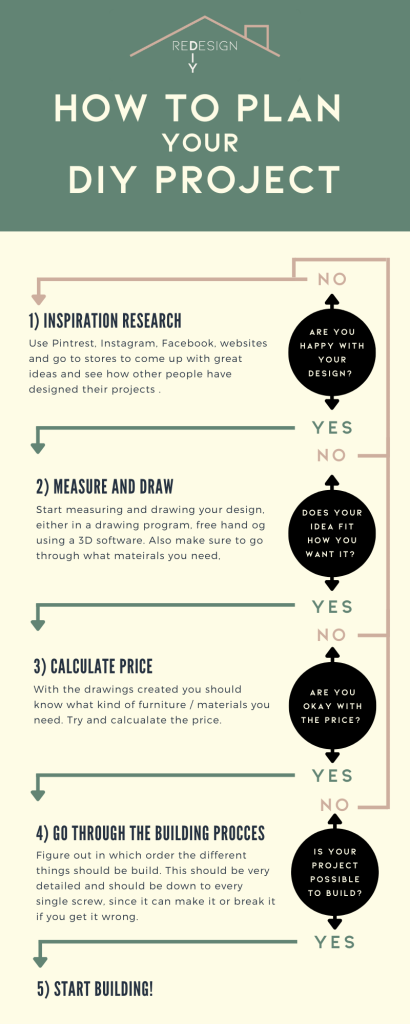
1) Inspiration Research
The first step in planning your DIY project is gathering inspiration. Spend some time exploring various platforms like Pinterest, Instagram, and Facebook, as well as visiting websites dedicated to DIY projects. Seeing how others have designed and built similar projects can spark ideas and help you refine your own plans. Don’t just limit yourself to online research—take a trip to local stores to see designs, materials, and furniture options in person.
During this stage, ask yourself, “Am I happy with my design?” If the answer is yes, move on to the next step. If not, go back and continue your inspiration research until you have a clear vision of what you want to create.
Pro Tip: Create a mood board or a digital collection of photos that capture the style, colors, and materials you’re aiming for. This will serve as a reference point throughout the project.
Are you happy with your design?
- Yes: Move to the next step.
- No: Restart step 1.
2) Measure and Draw
Next up in planning your DIY project is the measurement and drawing phase. Start by measuring the area where your project will take place. Accurate measurements are essential to ensure that your design will fit perfectly within the intended space.
Once you have the measurements, it’s time to draw out your design. You can do this freehand on paper, use a drawing program, or take advantage of 3D software for a more detailed and realistic view of your project. The drawing process also includes identifying the materials you’ll need, so make sure to jot down a comprehensive materials list.
Pro Tip: Using 3D software can give you a better sense of how your project will look and fit within the space. It also allows you to experiment with different layouts and designs before committing to a final plan.
Does your idea fit how you want it?
- Yes: Move to the next step.
- No: Go back to step 1 for more inspiration and adjustments.
3) Calculate the Price
A crucial part of planning your DIY project is determining the cost. With your design and materials list ready, start calculating the total price of your project. Look up the prices of the materials and any furniture you plan to include. Make sure to consider every aspect, from large items like lumber and tools to smaller essentials like screws, nails, and paint.
This is the stage where you’ll need to decide if the project is within your budget. If the price is too high, consider revisiting your design to find areas where you can cut costs without compromising on quality.
Pro Tip: Check for discounts or sales on materials, or consider upcycling and using leftover materials from previous projects to save money.
Are you okay with the price?
- Yes: Move to the next step.
- No: Go back to step 1 to revise your design and material choices.
4) Go Through the Building Process
The next step in planning your DIY project is to figure out the building process in detail. This involves creating a step-by-step plan of how you will assemble your project, including the order of construction and the tools you’ll need for each step. Being thorough at this stage is crucial; understanding the building process down to the smallest details (yes, even every single screw!) can prevent costly mistakes and ensure the project is structurally sound.
Think about potential challenges you might encounter and how you’ll address them. For instance, if a particular material needs to be cut to a specific size, make sure you know how to do it accurately and safely.
Pro Tip: Create a checklist of the construction process so you can mark off each step as you go, helping you stay organized and on track.
Is your project possible to build?
- Yes: Move to the next step.
- No: Revisit step 1 to rethink your design and plan.
5) Start Building!
Congratulations! You’ve now completed the essential steps of planning your DIY project and are ready to start building. By following the previous steps, you’ve gathered inspiration, measured and designed your project, calculated costs, and prepared a detailed building plan. Now, it’s time to bring your vision to life. With a solid plan in place, the construction process will be smoother, more efficient, and more enjoyable.
Final Thoughts on Planning Your DIY Project
Planning your DIY project is the foundation of success. By taking the time to thoroughly research, measure, budget, and plan out the construction process, you set yourself up for a smoother build and a better end result. Skipping these planning steps can lead to costly mistakes, unnecessary stress, and a final product that may not meet your expectations.
Remember, the planning phase is an iterative process. Don’t be afraid to go back and make adjustments if something doesn’t feel right. A little extra time spent in the planning phase can save you a lot of trouble during the building process. So, gather your inspiration, measure twice, budget wisely, and then get building!
Ready to take on your next DIY project? Follow this guide, and you’ll be well on your way to creating something amazing!
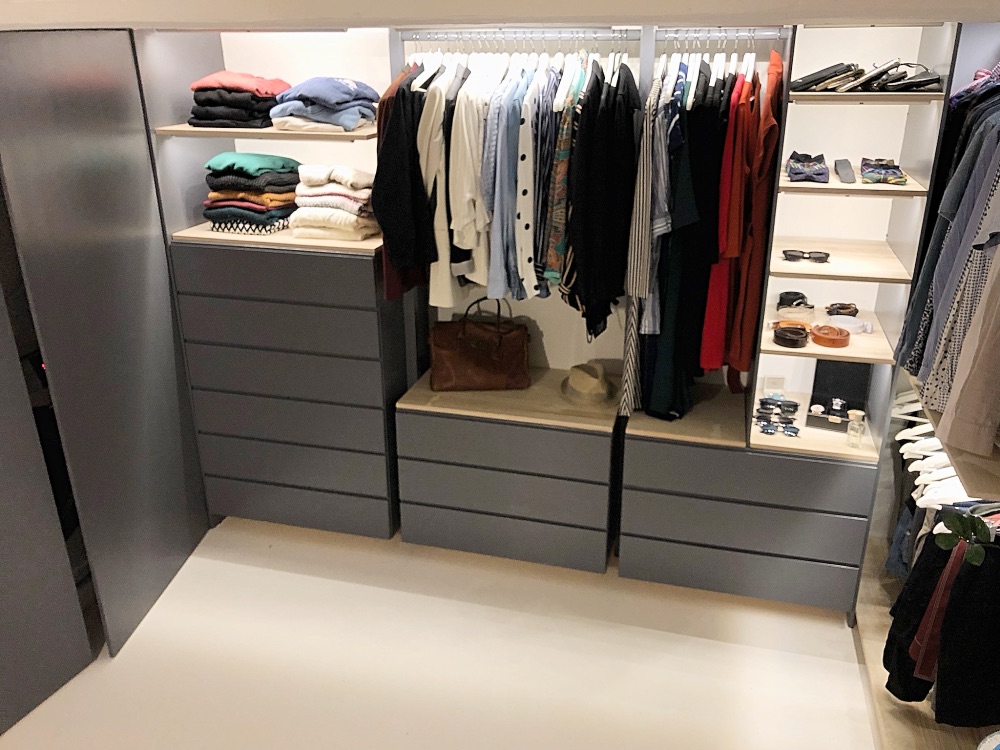
How much to build a walk in closet
How much to build a walk in closet
Have you always dreamed of having a spacious walk-in closet but aren’t sure about the cost? You’re in luck! We’ve broken down every expense involved in our walk-in closet project to give you a detailed idea of how much it costs to build a walk-in closet. From the painting to the furniture and building materials, we’ve accounted for it all. For a full step-by-step guide on our closet build, check out our article: Building a Walk-In Closet in Basement – Step by Step.
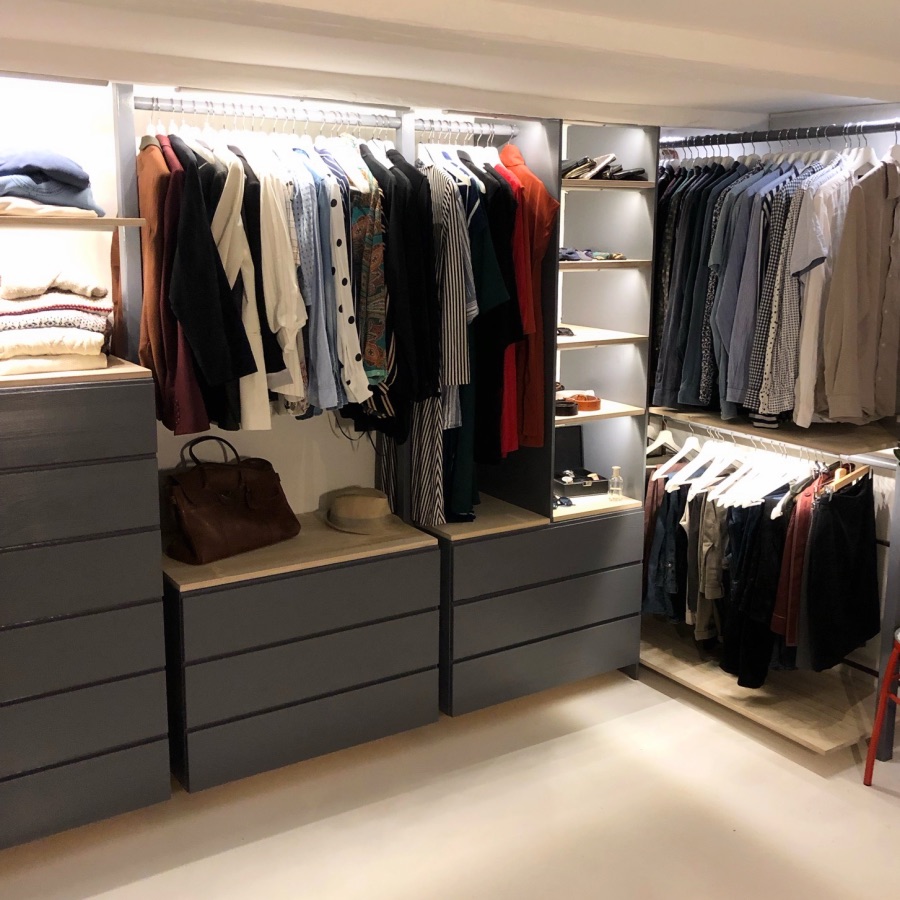
The Budget
Before we jump into the numbers, it’s worth mentioning that we already had most of the essential tools for preparation, building, and painting. So, the prices listed below focus solely on materials, furniture, and extras required for the build. We’ve included the costs in both Danish Krone (DKK) and US dollars ($) to give you a comprehensive picture of the total expense.
1. Paint
A significant part of how much it costs to build a walk-in closet goes into painting. From the floor to the ceiling and the closet itself, paint helps achieve a clean and cohesive look. Here’s what we used:
- Floor Paint: We bought 2 x 2.5 liters of floor paint at 160 DKK each = 320 DKK (approx. $49).
- Wall and Ceiling Paint: We used 5 liters of paint, which cost us 500 DKK (approx. $76).
- Closet Paint: To paint the closet, we spent 800 DKK (approx. $122).
- Base Layer for Closet: For the base layer, we used primer costing 300 DKK (approx. $46).
Total Paint Cost: 1920 DKK (approx. $293)
2. Furniture
Furniture is often the largest expense when calculating how much to build a walk-in closet. We chose IKEA Ivar drawers and wooden shelves to create a customized storage system:
- 4 x Ivar Drawers: Each drawer cost 600 DKK = 2400 DKK (approx. $366).
- 6 Wooden Shelves from Bauhaus: We used shelves sized 2200 x 500 x 18 mm, each priced at 240 DKK = 1440 DKK (approx. $220).
Total Furniture Cost: 3840 DKK (approx. $586)
3. Building Materials
When considering how much to build a walk-in closet, the cost of building materials like wood, dowels, and MDF plates is a significant factor. Here’s what we used:
- Round Log for Hangers (4 meters): 300 DKK (approx. $46).
- 3 Pieces of 12 mm MDF Plate (2440 x 1220 mm): Each plate cost 270 DKK = 810 DKK (approx. $124).
- 15 Meters of Wooden Square Dowel Rod: Priced at 15 DKK per meter = 225 DKK (approx. $35).
Total Building Material Cost: 1335 DKK (approx. $205)
4. IKEA Light System – Skydrag LED Light
Lighting is often overlooked when budgeting for how much to build a walk-in closet, but it can have a big impact on the final look and functionality. We opted for IKEA’s Skydrag LED light system:
- 5 x 40 cm LED Lights: Each priced at 80 DKK = 200 DKK (approx. $30).
- 5 x 80 cm LED Lights: Each priced at 150 DKK = 750 DKK (approx. $115).
- 2 x Wireless Drivers: Each costing 119 DKK = 238 DKK (approx. $36).
- 1 x Wireless Switch: 99 DKK (approx. $15).
- Package with 2 LED Spots: 99 DKK (approx. $15).
- Plastic Trays to Hide Wires: 99 DKK (approx. $15).
Total Lighting Cost: 1485 DKK (approx. $226)
5. Extras
Small items like screws, wall plugs, and fillers add up when figuring out how much to build a walk-in closet. Here’s what we needed:
- Screws, Wall Plugs, and Iron Angles: 300 DKK (approx. $46).
- Multi Filler: 60 DKK (approx. $7).
Total Extras Cost: 360 DKK (approx. $53)
Grand Total: How Much to Build a Walk-In Closet?
After adding up all these expenses, the total cost to build our walk-in closet came to:
- 8940 DKK (approx. $1363)
Where to Save and Where to Splurge
If you’re considering how much to build a walk-in closet, there are some areas where you can choose to save or invest more based on your preferences and needs. For example:
- Save on Paint: You can opt for budget-friendly paint options or reuse leftover paint from previous projects.
- Invest in Furniture: Quality drawers and shelves are worth the investment since they’ll serve as the primary storage components in your closet.
- Lighting: While you could opt for cheaper lighting, investing in a quality system like the IKEA Skydrag gives your closet a more professional and polished look.
Final Thoughts on How Much to Build a Walk-In Closet
So, how much does it cost to build a walk-in closet? In our case, we managed to build a stylish, functional closet for approximately $1363. The exact cost will vary depending on factors like the size of your space, the quality of materials, and any custom features you want to include. However, this breakdown should give you a solid starting point for budgeting your own walk-in closet project.
Building a walk-in closet is an investment in both your home and your lifestyle, creating a personalized space that can keep you organized and add a touch of luxury to your daily routine. With careful planning and budgeting, you can create the closet of your dreams without breaking the bank.
Ready to Start Your Closet Build? Check out our full step-by-step guide: Building a Walk-In Closet in Basement – Stepby Step to see how we brought this project to life!

Apartment Floor Plan
Apartment Floor Plan
We recently started renovating an apartment that has a unique and, frankly, quite funky layout. To give you a better idea of what we’re working with, let’s take a closer look at the apartment floor plan. This layout is unlike any typical apartment setup, with multiple levels and interesting use of space, making this renovation both challenging and exciting!
Overview of the Apartment Floor Plan

When you first glance at the apartment floor plan, you’ll notice that the layout consists of various levels, each serving a different function. The entrance, toilet, kitchen, bedroom, and dining room are all on the main level. However, as you move through the apartment, you’ll encounter some surprising features that set this floor plan apart.
One of the most intriguing aspects of this apartment is that the living room is situated about 70 centimeters lower than the main entrance floor. Additionally, the living room boasts an impressive ceiling height of more than 4 meters! The previous owners took advantage of this high ceiling by building a loft area. This clever use of vertical space gives the impression of the living room having two distinct floors. The loft itself is approximately 1 meter higher than the entrance floor, adding yet another layer to the apartment floor plan.
And that’s not all! Beneath the living room lies a basement of around 15 square meters, providing additional storage or functional space. This multi-level layout offers a unique opportunity to get creative with the redesign, but it also means careful planning is needed to maximize every corner.
The easiest way to understand the complexity and charm of this apartment floor plan is to watch the video below, which we took on the very first day we saw the place. It gives you a real sense of how these different levels and spaces interact with each other.
Pictures from day 1
Entrance
The entrance area connects directly to the main level, where you’ll find the bathroom, kitchen, bedroom, and dining room. From here, you can access different parts of the apartment, which makes it the central hub of this unique apartment floor plan.

Bathroom
Just off the entrance is the bathroom. Its placement is typical for most apartment layouts, providing easy access from the bedroom and common areas. However, since this is on the main level, the challenge is to integrate it seamlessly with the rest of the design, especially considering the varying floor heights in other parts of the apartment.

Bedroom
The bedroom also sits on the main level, positioned close to the entrance. The apartment floor plan makes smart use of the available space, keeping the bedroom tucked away for privacy while still being accessible from other rooms.

Kitchen
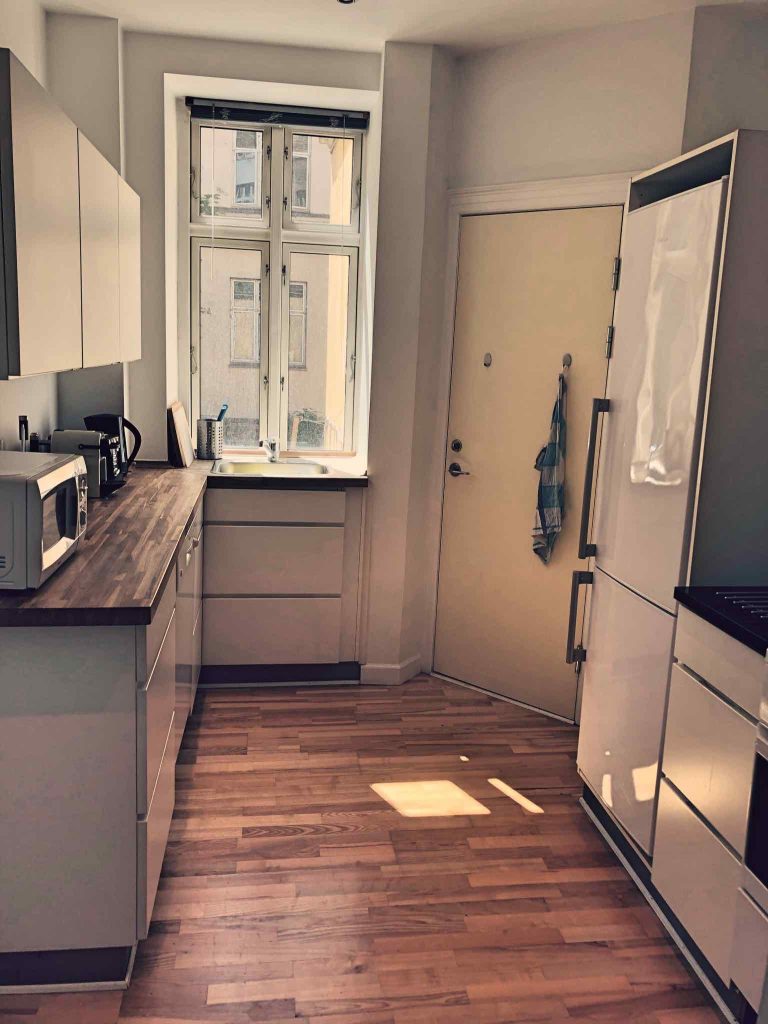
Adjacent to the bedroom, the kitchen is also located on the main level. This part of the apartment floor plan has a traditional setup, making it functional for cooking and entertaining. However, its proximity to the other rooms means we’ll need to get creative with our redesign to avoid a cramped feeling.
Entrance to living room from dinning room
From the dining room, a set of stairs leads down into the living room, marking the first major level change in the apartment floor plan. This transition is key to the apartment’s unique character, as it signals the move into a different spatial experience within the same home.
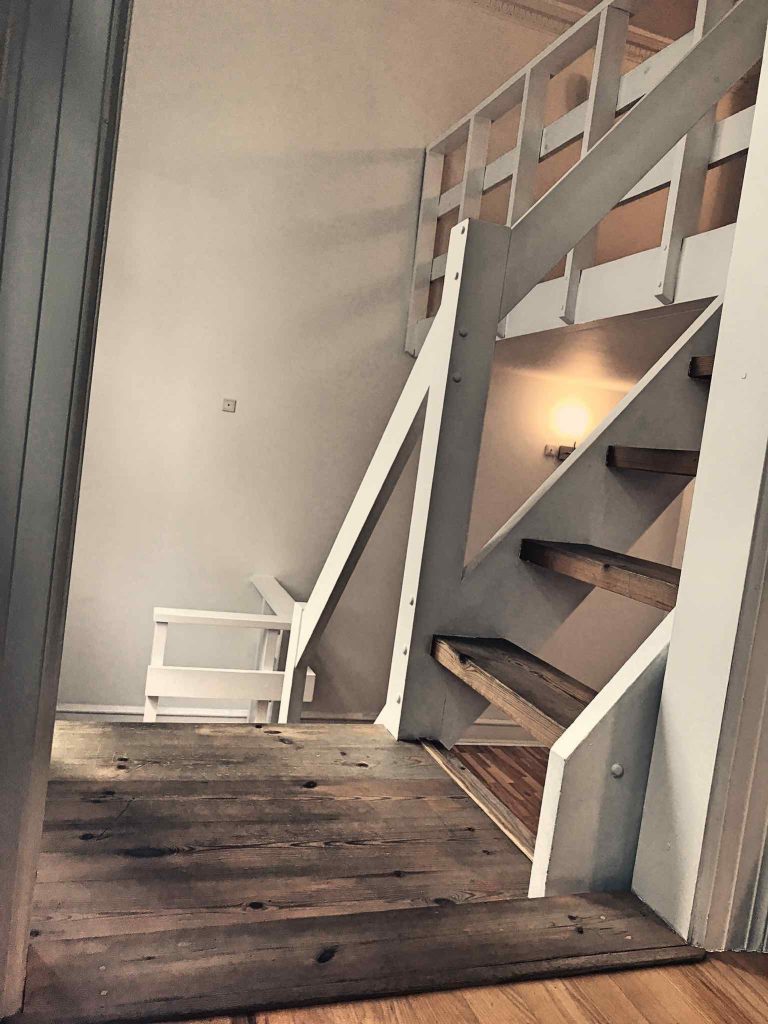
Stairs to loft and into dinning room
The living room is perhaps the most striking feature of this apartment floor plan. Positioned 70 centimeters below the main level, it has an incredibly high ceiling that adds to its grandeur. To maximize this space, the previous owners constructed a loft area about 1 meter above the main entrance floor. This loft not only makes clever use of the vertical height but also creates an impression of the living room being split into two different levels. This part of the floor plan provides a lot of flexibility, allowing the loft to serve as an office, reading nook, or additional sleeping area.
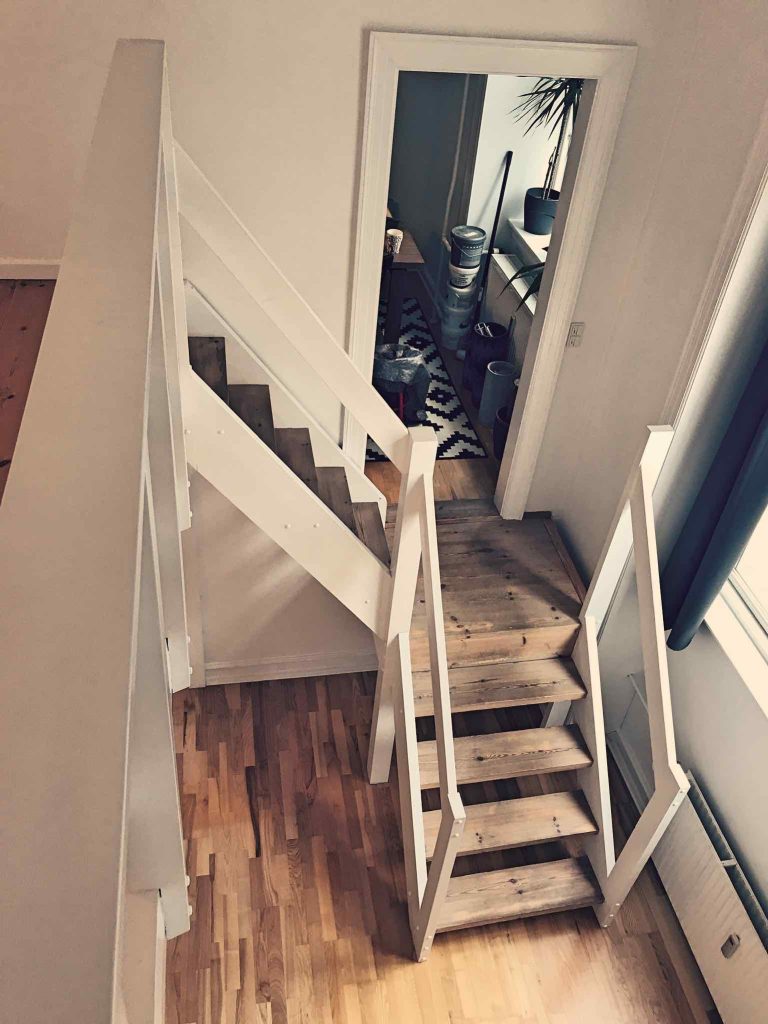
Stairs play a crucial role in navigating this apartment floor plan. There are stairs leading up to the loft from the living room, as well as stairs connecting the loft to the dining room. This intricate network of staircases gives the apartment a dynamic flow and adds to the “funky” nature of its layout.
Loft area
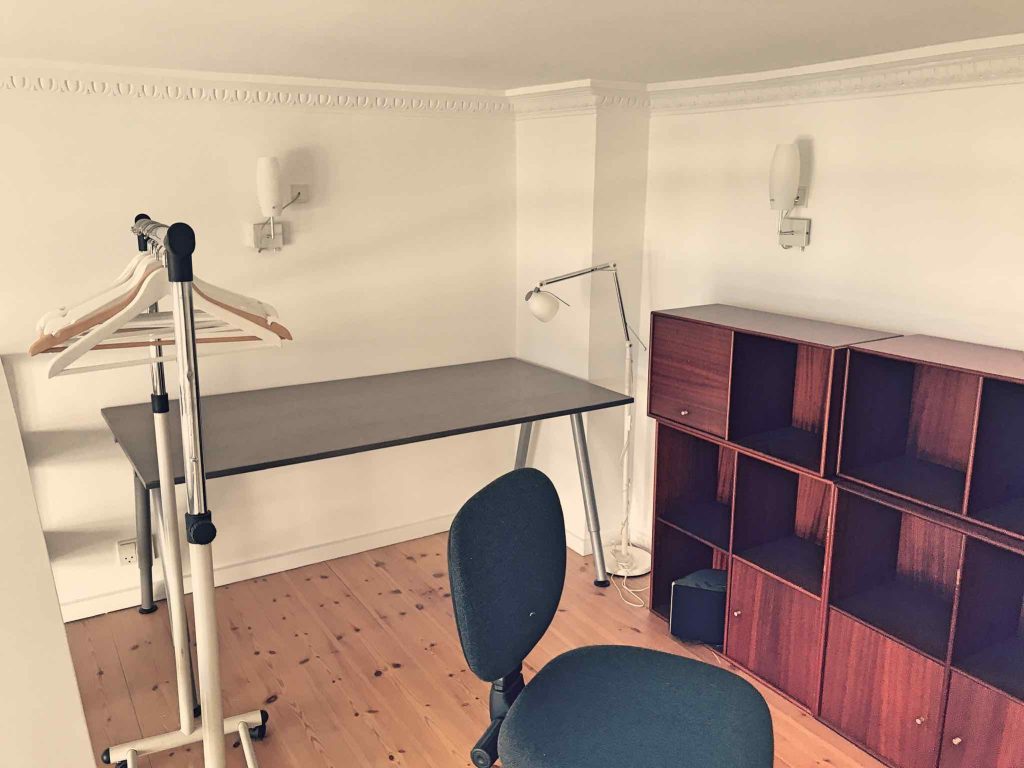
Stairs to loft and dinning room form living room

Stairs down to basement from living room
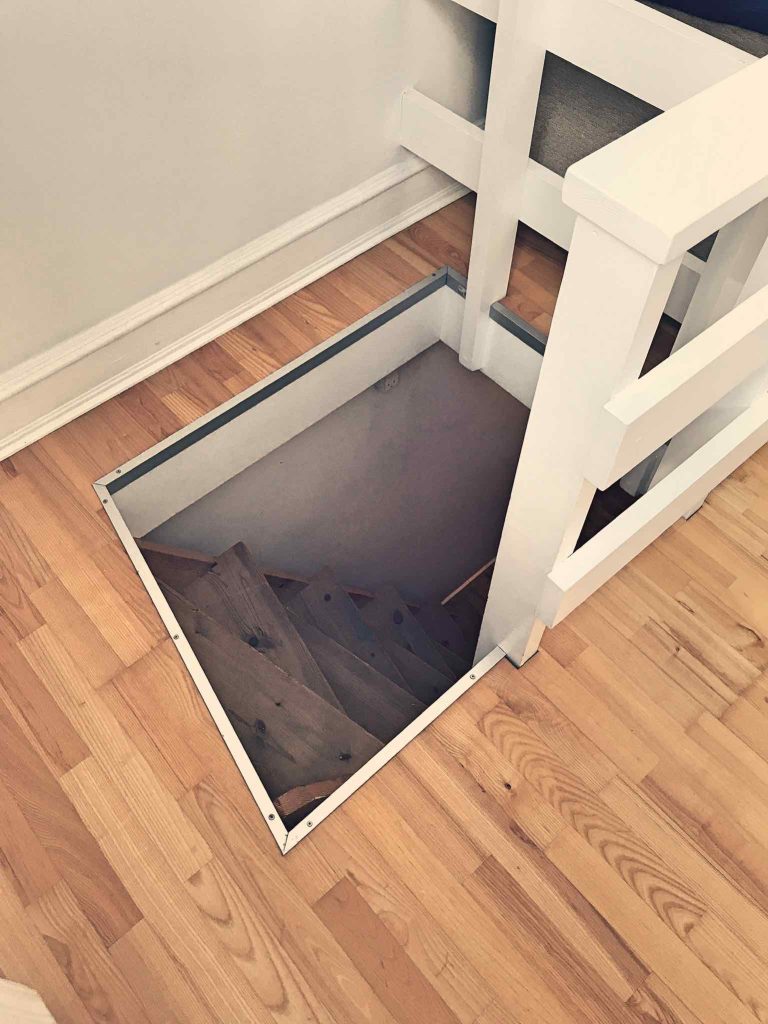
From the living room, a separate set of stairs takes you down to the basement. Covering around 15 square meters, this basement area provides much-needed extra storage or could even be transformed into a functional space, such as a small gym, wine cellar, or home office. The inclusion of a basement is a hidden gem in this apartment floor plan, offering more versatility than the layout initially suggests.
Stairs from living room to basement

Basement

Final Thoughts on This Unique Apartment Floor Plan
This apartment floor plan is far from conventional, with its multi-level design, loft area, and basement. The unique layout provides both challenges and exciting opportunities for redesign. Our goal is to make the most of each area while preserving the character and flow that make this space truly one-of-a-kind.
By understanding the quirks and possibilities of this apartment floor plan, we’re excited to create a functional yet stylish living environment that maximizes every square meter. Stay tuned for more updates as we continue to transform this funky layout into a dream living space!

Best Home Redesign App = Roomsketcher
Best Home Redesign App = RoomSketcher
Are you the kind of person who loves to see your home redesign ideas before diving into the actual build? You’re not alone! Visualizing a project beforehand can save time, money, and stress. That’s why we set out to find the best home redesign app available, and after trying out several options, we found our winner: RoomSketcher.

Before starting any of our projects, we believe it’s crucial to test out different design ideas and visualize them in detail. RoomSketcher allows us to do just that. Having the ability to create accurate 3D models of our rooms has made the entire redesign process smoother and more enjoyable. After testing various 3D software, RoomSketcher stood out as the best home redesign app for its ease of use, affordability, and impressive range of features.
User-Friendly Interface
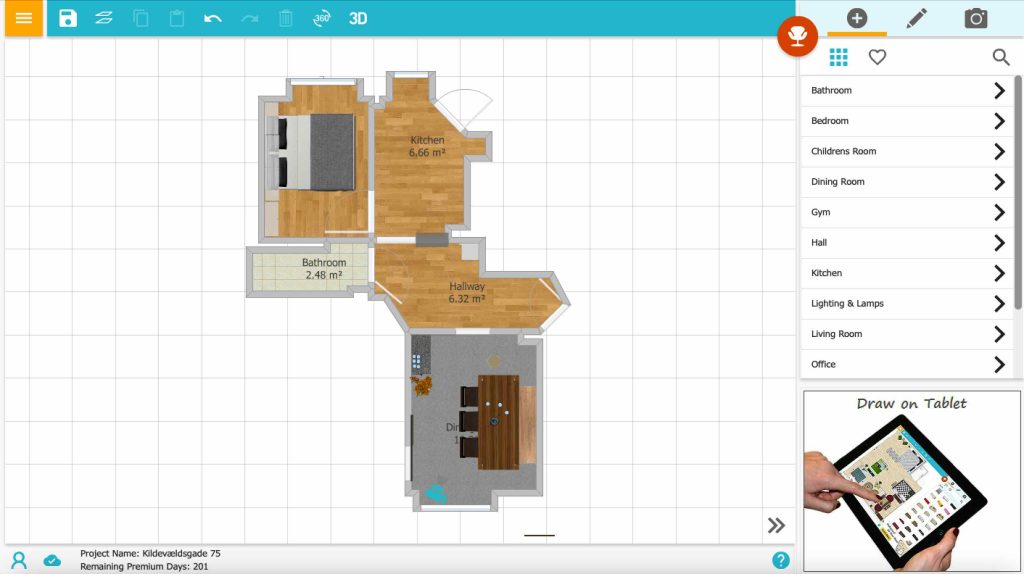
RoomSketcher offers a free version, but to get the full range of customization options, we went for the VIP version at just $49 per year. It has been worth every penny! This investment opened up a world of possibilities for us to create, modify, and visualize our redesign ideas effortlessly.
One of the standout features that makes RoomSketcher the best home redesign app is its user-friendly interface. The overall UI is intuitive and not overly complicated, even for beginners. After just a few hours of playing around, you’ll find it easy to create whatever design you have in mind. The process starts with building a detailed floor plan, adding walls, windows, doors, and defining the dimensions of each room.
Projects and Floor Plans

RoomSketcher allows you to create multiple projects, each containing several different floor plans. This flexibility is perfect if you want to explore multiple layouts for a single space. For example, when designing our basement, we probably saved around 20 different versions! You can adjust room measurements, wall heights, and types of walls to see how each change impacts the overall design. This level of customization is what sets RoomSketcher apart as an exceptional home redesign app.

For each floorplan you can specify the rooms measurements (wall height, type etc)
Adding Furniture and Materials

Once your rooms are set, it’s time to bring them to life by adding furniture. RoomSketcher offers an extensive library of furniture options, and if you opt for the VIP version (which we highly recommend), you’ll gain access to even more choices. We found the selection in the pro-version to be more than sufficient for our needs. You can also purchase additional furniture bundles if you want to expand your design possibilities even further.
Not only can you add furniture, but you can also experiment with different materials for walls, ceilings, and floors. With just a single click, you can change the entire flooring of your room to see how it would look. This ability to mix and match materials and styles in real-time is what makes RoomSketcher the best home redesign app for visualizing changes instantly.

Visualizing in 3D
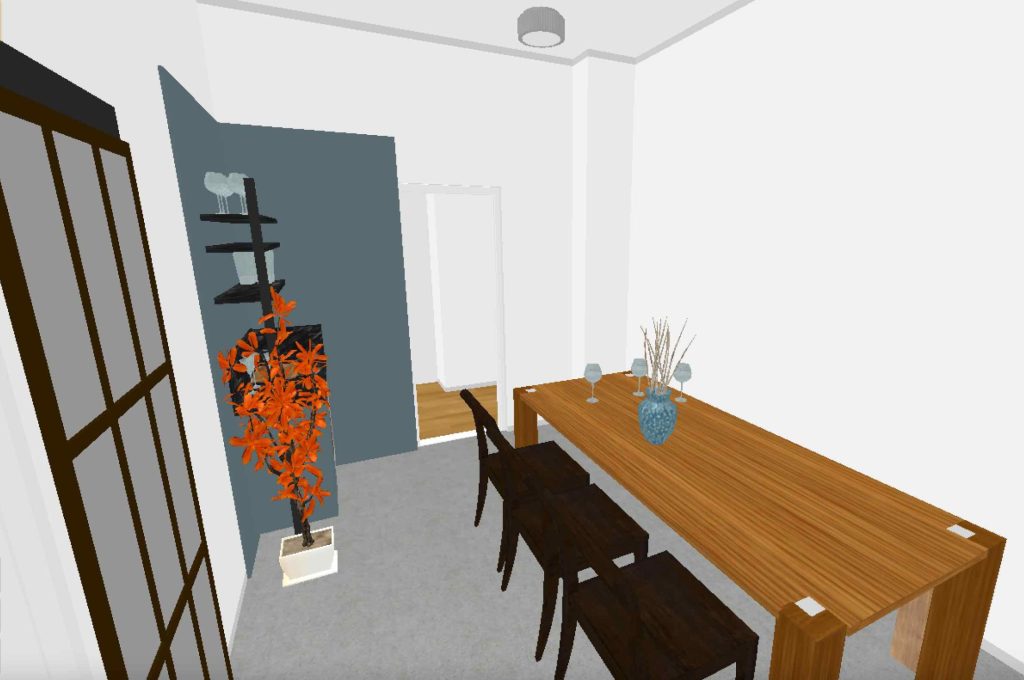
One of our favorite features in RoomSketcher is the 3D visualization tool. Once you’ve created a room layout that you’re happy with, simply click on “3D” to view a fully-rendered, 3D version of your room. You can navigate around the space, look in all directions, and place yourself anywhere in the room to get a feel for how it would look in real life.
This dynamic 3D view allows you to see how different design elements interact within the space, ensuring that your redesign works both aesthetically and functionally. This ability to walk through a virtual room is a game-changer, making RoomSketcher the best home redesign app for both novice designers and experienced DIY enthusiasts.
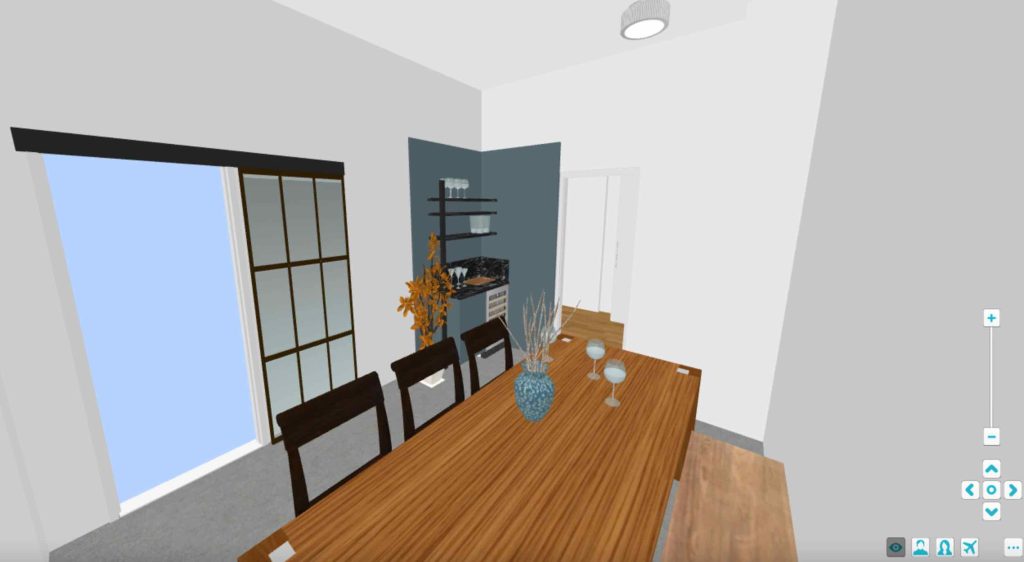
Simulate Real-Life Dimensions

If you’re curious about how the room’s dimensions will work in real life, RoomSketcher also lets you walk around your design with an avatar in the browser version. This feature allows you to get a true sense of scale, showing how the space feels relative to a human being. It’s almost like stepping into a real-life version of The Sims! This immersive experience is another reason why RoomSketcher ranks as the best home redesign app for exploring the flow and functionality of your space.
Why RoomSketcher is the Best Home Redesign App for Us
After using RoomSketcher extensively for various projects, we can confidently say it’s the best home redesign app we’ve found. Its combination of a user-friendly interface, extensive furniture and material options, and impressive 3D visualization capabilities make it a versatile and powerful tool. Plus, with an annual fee of just $49 for the VIP version, it’s an affordable option that offers professional-grade features.
Whether you’re redesigning a single room or planning an entire home makeover, RoomSketcher provides the tools and flexibility you need to visualize your ideas before committing to them. This has made our design process not only more efficient but also a lot more fun!
Final Thoughts on RoomSketcher – The Best Home Redesign App
In the world of home design, being able to visualize your ideas before execution is invaluable. RoomSketcher allows you to do just that, making it the best home redesign app for both DIY enthusiasts and professionals alike. With its intuitive interface, vast customization options, and powerful 3D visualization tools, it takes the guesswork out of home redesign. We love using it for our projects and highly recommend it if you’re looking to bring your home design ideas to life.
Ready to start your next redesign? Give RoomSketcher a try and see for yourself why it’s the top choice for home redesign apps!

DIY Small Walk In Closet
9 DIY Small Walk In Closet Designs
When we decided to take on the challenge of creating a DIY small walk-in closet in our basement, we brainstormed a variety of designs. Some were practical, while others were just fun to play around with during the planning phase. We went through a lot of trial and error, but it was all part of the creative process. Here, we’ll take you through 9 of the design ideas we considered, from the earliest sketches to the final layout that became our cozy walk-in closet. At the end, we’ll even share how our final design turned out in real life!
The original room

Before jumping into the designs, let’s talk about the starting point. The room was a basic basement space with a washing machine and tumble dryer already installed. Here’s a 3D model of the original room, which we created using RoomSketcher (check out our full review of this fantastic design tool here: Best Home Redesign App).
Design 1

In our first design idea, we thought about moving the washing machine and tumble dryer to a different spot. We were full of ambition, thinking, “We can place these wherever we want!” But, reality struck when we realized that the water pipes were fixed in place. Moving the appliances would turn into a massive plumbing project, so this design idea was quickly shelved. A bit disappointing, but hey, it’s all part of the DIY journey!
Design 2

With the second design, we kept the washing machine and dryer where they were (lesson learned!). This time, we thought about adding a little chair in the middle of the room—a cozy spot to sit down while changing shoes or taking a quick break. The idea was appealing, but it felt like the space was getting too cramped, especially since this is a small walk-in closet we’re working with.
Design 3

Now, this is where things got interesting! In design three, we decided to build the closet around the washing machine and tumble dryer. In the 3D model, you can see that big brown box on the left side; that’s the enclosure we planned for the appliances. This setup gave us a much clearer idea of how we could use the remaining space for shelving and storage. We started feeling optimistic about this layout!
Design 4
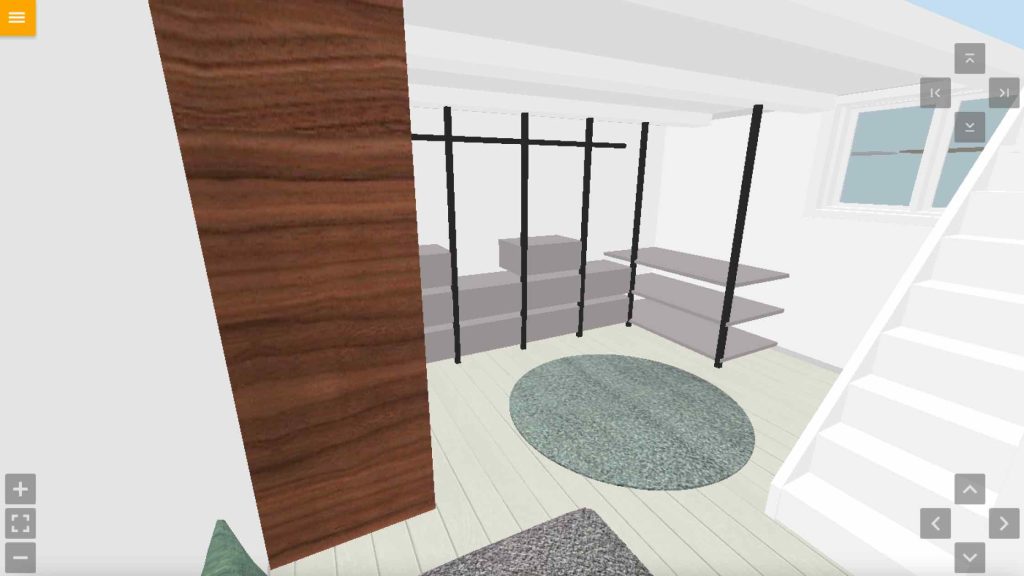
Similar to Design 3, we wanted to experiment with different shelf and drawer colors. The color scheme is an essential part of any small walk-in closet design because it directly impacts the room’s feel. We played around with some darker wood tones for this one, hoping to bring a bit of warmth and elegance into the basement. It didn’t quite match our vision, but it was a step in the right direction.
Design 5

For the fifth design, we took a completely different approach. Instead of focusing on drawers, we envisioned more cupboards and high closets. This setup felt great for maximizing storage, but it also made the room look a bit overwhelming. The taller closets ended up feeling a little too massive for a small walk-in closet, so we moved on from this idea.
Design 6

By now, we were getting closer to what would eventually become our final design. In this layout, we tried out various wooden textures and colors. It had a simple and practical arrangement, but the wood was not quite the look we wanted. However, this design taught us a lot about balancing storage space with aesthetic appeal in a small walk-in closet.
Design 7

Then came Design 7—a real game changer. We shifted to a much lighter wood color after realizing how crucial lighting would be in our basement walk-in closet. We wanted to create a bright and welcoming space that wouldn’t feel like a dark corner of the house. This lighter wood made the room look bigger and more open, a must for any small walk-in closet!
Design 8

With this design, we kept the light wood but played around with different drawer setups. Drawer configuration is a key factor in maximizing space in a small walk-in closet. We debated over what would be most practical for storing clothes, shoes, and other items. This design felt quite close to what we wanted, but there was still room for refinement.
Design 9 - The final design

Here it is—the final design! We took everything we learned from the previous versions and landed on this setup. The main takeaway? We needed to work around the fixed elements in the room, like the pipes running along the right wall. That meant drawers against that wall were out of the question. Instead, we focused on using the left and middle parts of the room for storage and shelving. The result was a practical, stylish small walk-in closet that fits all our needs!
Curious to see how our DIY small walk-in closet turned out?
Watch the full video of our final design and see how we transformed this basement space into a functional and beautiful closet.
After all the designing and building, this is how our small walk-in closet looks now! We’re thrilled with how it turned out—it’s functional, cozy, and makes the best use of the space we had. For a full walkthrough of our final build and all the DIY steps, check out our detailed article here.
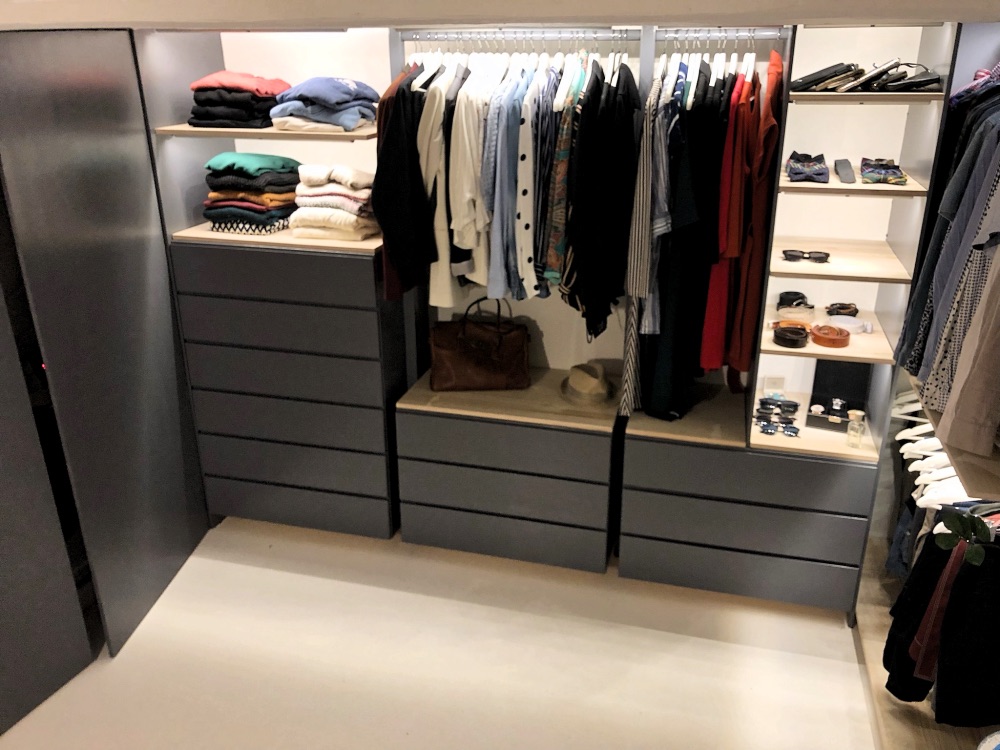
Designing a small walk-in closet is all about balancing form and function. We went through nine different design ideas before we found the perfect layout for our basement closet. Each design taught us something new about space optimization, color choices, and practical considerations like plumbing. Hopefully, our process gives you some inspiration for your own DIY small walk-in closet project!
Recent Posts
GET IN TOUCH
Copyright @ 2024 - Redesign DIY


